Making great games is hard. You need to get all the art made, you need good music, you need engaging game play and a story that players want to believe and follow through, you need to do a lot of programming and on top of all that, it needs to be so original that people don't go "that's just like [fill in similar game here], only nowhere near as good".
That said...
Making games is actually not as hard as you might think, if long as you're not trying to make the next "big game" that everyone should want to play forever. In fact, at the end of this tutorial, I'm fairly confident we'll have made a simple game with the potential for making much more elaborate while being fun to play.
So, do you want to learn to make games? Then let's go!
For our game, we're going to use a library for writing 2D sprite-based games, using Processing.js. If you don't know what that means, don't worry: it means we'll be making a 2D game that uses images for everything (like enemies, backgrounds, etc) and relies on a fairly simple programming language. Yes, we'll be programming, but we'll be able to see what we're doing so it's okay =)
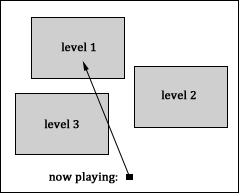
Let's start with the basics: a game is a word we use to describe a collection of screens that do differen things. It may have a menu, it may have multiple levels, bonus areas, loading screens, etc. etc. — So, when we're talking about making a game, we need to make a few things before we have something we can "play":
So let's look at making this all happen!
In the game-making library that we're using, setting up the thing that wraps everything that is "part of our game" is relatively simple, requiring us to say a few things. We need to:
screenWidth is,screenHeight is, andSo let's start programming. And when I say "let's" I really mean "let me show you how we're going to do all these things" =D
This code isn't very exciting, and it doesn't do anything yet, but it shows those things
that we need to set up. The screenWidth and screenHeight values
say "this is how big our game is going to be". In this case, 200 by 200 pixels on the screen.
Since computer screens all have different sizes, at least for now we're simply going to pick
a fixed size so that things always look the same on different screens (in case you were curious,
the "final" means that we cannot change these values once our game is running, and the "int"
means they are "integer" numbers, which are whole numbers like 0, 4, or 100, rather than numbers
with a fraction, like 0.5 or 3.1415)
That void initialize() {} code is the more important part. The void
part isn't very important right now, but it technically means "this is a function that can
be called, but it just 'does things', it doesn't try to make things or calculate values
or anything". The initialize() gives the name of the function ("initialize") and
says that it doesn't require any input (if it does, there will be something between the "()",
also called 'parentheses'). We'll look at those a little later. Finally, the "{}" part is
the most important bit: this is part that contains any programming code that is run when we
call this function.
initialize is a function that is automatically called by our game library
when we start up a game. It first makes sure the screen size is set to the width and height
that we indicated, then it does some things that aren't very important for us, but need to
be done, and then it calls our initialize function to find out what it's actually
supposed to do in order to run our game. Because, in the code above, we didn't actually
tell it to do anything, the result is going to be this:
So... that doesn't do very much! It's a grey screen, 200 pixels wide, and 200 pixels high.
This is boring, and not very much like a game. So let's add some instructions for the game library
to perform when it looks at initialize.
Let's start by adding some instructions so that we actually have a level:
There are two new things in this updated code. First, we see the line addScreen("mylevel",
new MyLevel(screenWidth, screenHeight)); which we should read as:
addScreen("the name of this level", <some level>), and new MyLevel(screenWidth, screenHeight).The addScreen(name, level) function is another function that is provided by the
game library. We can call it to add levels to our game, and we can add as many as we like,
as long as we give them all their own name. The new MyLevel(...) bit says "make
a new level, of the "MyLevel" kind, and when you make it, tell it two things: the first thing
is the screenWidth value, and the second thing is the screenHeight value.
So why do we have to do that? Even though our game shows only 200 by 200 pixels, levels can be much bigger than that. If you've ever played a platforming game, you usually don't stay on just one screen, you can move around, and as you do, you see parts of the level you didn't see from where you started. So right now we're making a new level that is exactly the size of the screen. There's "nothing" outside of it, and for now that's fine, and then we'll make a bigger level once we've got something simple we can actually play with!
So that leaves that other thing
What the heck is this? Well, remember that we told the game library that we wanted to build a new "MyLevel". However, it has no idea what that is, so in this bit of code we teach it what a "Mylevel" is. Rather than defining just a single "MyLevel", and telling the library "this is what you should use", we give it the description of a "MyLevel" instead, so that the library can make as many as we tell it to. A bit like the difference between giving someone who's never seen a pet before a picture of your pet, or describing what a pet is. If you show them a picture, they'll now think of your pet every time someone talks about pets. That's a bit silly, so instead you teach them what pets are, in general, and they'll thing of the right thing when people talk about pets.
The way we do this here is by using the word class, which tells the library "pay
attention! I'm going to describe a ... to you now!" In this case, we're describing a "MyLevel",
so that's the next word. The next two words, extends Level, tell the game library
that you're going to describe it as something that's like something it already knows, namely
a Level. Just like before, everything between the "{}" is the important part: in this case,
we tell it to construct a new MyLevel!
If we remove the parts that tell the library that we're describing MyLevel, we are left with this:
This is a special function. When we're describing things, we need what is known as a "constructor"
function. This is the function that we use when we say "make me a new ...", in this case a new MyLevel.
It says that it can only be called with two things, a number that respents the level's width, and
a number that represents the level's height. They are "float" numbers, which means they have a "floating
decimal point": we can use fractions! If we wanted to make a level that is only half a pixel wide, and
one and a half pixel height, we could do that by using new MyLevel(0.5, 1.5) and the game
library would go "okay! I will make this for you." Of course that's a little small, but if we wanted
to, we could!
Then inside the "{}" is the set of instructions that should be run through when "new MyLevel" is called anywhere. In this case we're doing something special: we're telling the game library "You know what, I already told you that this MyLevel thing is a kind of Level, and you already know about levels. Instead of doing anything new, when you make a new MyLevel, just do whatever you do when you make a new Level. I don't need you to do anything more than that."
This uses the word super, which doesn't mean that everything's fantastic, but is a special
word that refers to a thing's "super-description". "Super" comes from the Latin, where it doesn't mean
"fantastic" or "awesome", but actually means "higher" or "above". In programming (specifically, object
oriented program, which is secretly what we're doing here!) we tend to talk about descriptions, which
we call "classes" as being either "super" classes, or "sub" classes. A quick example: house cats are
a kind of cat (like cheetas or lions), which are mammals (like cows and dogs), which are in turn animals
(like chickens and spiders). So we can say:
In our case, "Level" is the superclass for "MyLevel", and we can tell the game library that we
want to talk about "Level" rather than "MyLevel" by using super.
So we have a level now! Except it doesn't do very much yet because there's nothing in it! So what do we put in levels? The answer is "level layers". When you're playing games, it usually looks like the level is one thing that you're running, walking or flying through, but it's actually more detailed than that. Although, luckily, not by a lot (which is good, or we'd be here all day setting up endless bits of code before we even get to seeing something interesting!).
So a game consists of levels, and a level consists of level layers. Each level layer in turn contains various things, but that's where it ends, because layers contain the things we actually draw! This is what you can put in a layer:
All these things are what you expect to find in a game, and at the end of this tutorial, we'll have added all of these to our game! However, let's keep it simple for now. Here's what we're going to add to make our first attempt at a very simple game:
So first things first: let's make a level layer. The game library already knows about level layers in general, but we want to use our own, so we're going to describe how to make one in the same way that we made a level, earlier:
Can you identify what the different parts here do?
Like before, class MyLevelLayer extends LevelLayer says "pay attention! What follows
is a desciption of a MyLevelLayer. And it's like the LeveLayer thing that you already know". Then,
the MyLevelLayer(Level parent, float w, float h) bit tells the game library how we should
phrase our "make me a new MyLevelLayer" code: we need to say is which level this is a level layer for.
That's pretty important! We don't want it to show up in other levels we make, obviously. If we only tell
the game library about the owning level, the layer will have the same size as the level. That's pretty
handy, because normally that's what you want. However, if you want a differently sized level layer (and
later on we will!) we could also have added a width and height value to tell the game library what size
it should be using instead.
After the super instruction, we want to make sure our level layer is not a boring grey,
so we do two things: first, we come up with a better color. In this case a slightly greenish blue, using
the Red/Green/Blue combination 0, 130, 255. Each of the three colors can range between zero and 255, so
0, 130, 255 says "no red, medium intensity green, full blast blue". The resulting color is this:
To add a MyLevelLayer to the level we already made, we have to update the instructions for making a MyLevel:
The addScreenLayer function is something that game library provides, which we can
conveniently call to add level layers to the set of known layers for a level. So, we give it a
new level layer: new MyLevelLayer(this). The this word refers to
"this MyLevel". Which makes sense, because if we pretend that we're a MyLevel ourselves,
we would want any MyLevelLayer that we make to treat us as their owner. Whenever we want
to refer to "ourselves", we use the word this. So we're very close to having
something that we can play with... we just need a playable character!
Playable characters are a bit more elaborate than levels or level layers. The starting point should be pretty recognisable by now:
We're going to call our playable character "MyThingy" (mostly just because I like that name =) but we'll need a few things in it:
You probably already guessed how to do the first part: we rely on the super
class again:
Every player character needs to have a name, so that we can pick them out of the collection of characters we may end up having (bigger games usually have more than one!), so we tell the game library that our MyThingy character is like the "Player" thing it already knows, but with the name "thingy". After that, we tell the game library to then run the code that we'll describe in a function called setStates:
If you remember all the way at the top, there was an initialize() function.
This is kind of like that, too. First, we describe what it does: void says it
just "does things" without creating new things or calculating values that we want to get back
from it, and the part inside the "{}" is run by the game library. In this case, we're going
to add an idling state to our playable character.
Now, the game library already knows what "State" things are, and unlike Level or LeverLayer,
we don't have to define our own because the game library already knows everthing it'll need to
know to make things work the way we want them to. The instruction we give it consists of
two things: one is the convenient addState(...) function, that the game library
has ready for us to add states for individual characters, and the other is a new State(...)
instruction. What does that do?
When we want to make new states, we have to say two things. First, we have to say what the name of the state is. In this case, it's our character's idling state, so we call it "idle". So far, so good. The second thing tells the game engine what the picture for this should be. I've chosen this picture, which is stored as a "gif" image called "idle.gif":

Okay so it doesn't really look like a person at all, but that's okay. We'll replace it with something much more fun later. First, let's see if we can even use this image in our very simple game!
We also add a handleInput function, although because we don't know what we
want our character to do yet, we don't actually make it do anything:
So our full "MyThingy" class description looks like this:
And we add it to our level layer by using the convenient addPlayer function,
which requires us to give it a player, which a new MyThingy() would certainly be!
Finally! Everything is in place! Let's have a look at that:
Wait... where's our playable character? Well, right there, in the upper-left corner. If we don't tell the game engine where to put things it will simply always put them in the upper left corner. That's not particularly useful, so let's put our playable character in the middle of the screen, instead, which means putting it in the middle of the level layer we add it to:
Because we want to tinker with our MyThingy before we add it to the level layer,
we take it out of the addPlayer(...) function, and make it something
that we can tinker with first: MyThingy mt = new MyThingy() says
that we want to make a MyThingy, that we'll refer to in the instructions as "mt",
and which should be a new MyThingy. Excellent!
Now, to change its position, we can use the setPosition function
that the game library already knows about (because Player things have a setPosition
function), and we can give it the position it needs to place our MyThingy:
if we want it in the center of the screen, it should at half the screen's width
from the left, and half the screen's height from the top, so that's what we do
by using width/2 for "width divided by two" and height/2
for "height divided by two". But hold up! where did width and
height come from?
The game library gives most things a width and height
value that corresponds with (surprise!) its own width and height. So if we use
these inside MyLevelLayer, they will have values that correspond to the level layer's
width and height, and if we use them in MyThingy they'll refer to our thingy's
width and height. The game library has some useful things like that in it, and we'll
cover more of them as we use them, later on in this tutorial.
For now, let's see if that does what we wanted:
Hurray! That's better. Although it's more of a "picture" than a game right now =(
Before we'll consider ourselves done, let's make our playable character actually playable. Let's make the 'w', 'a', 's', and 'd' keys on your keyboard move our playable character around!
If you'll remember, there was a function called handleInput that we left
blank. I think it's time we actually put some instructions in there so we can handle
keyboard (and later, mouse) input!
But, first things first. Because we can handle input, we have to tell the game library which keys our MyThingy character wants to listen to. This is a little bit technical, but I'm sure you'll be able to follow along. First, we change our constructor for MyThingy:
This tells the game engine that we want to listen for the keys with the W, A, S and D symbol on it. One tricky thing is that it doesn't really care about upper or lower case, so it wants letters in upper case form. If we used 'w' instead of 'W', it wouldn't work! So it's a good thing we're using upper case letters.
Next, we add instructions to the handleInput function:
You can probably guess what this does, although the addImpulse instruction
make be a bit confusing. Let's look at what it means: if(...) { } tells the
game library "if ... is the case, then follow the instructions between {}". In this case,
we're using the test isKeyDown(...) which is a function that the game library
has that lets us test whether or not someone is pressing a specific key. Since we told
the library that we wanted to listen for W, A, S and D keys, we have four lines, one for
of such "if ..." lines: each letter.
Then, the bit that goes inside those {}: the addImpulse function gives
our character an "impulse", which means it gets some speed in a particular direction.
Each time the game library redraws the screen, our character will have moved a little
bit, horizontal and/or vertically, and how much it has moved depends on what we tell
addImpulse. The first thing we tell it indicates how much we want to move
horizontally: negative numbers move us left, and positive numbers move us right,
so for 'A' we want to move left by one step (-1) and 'D' we want to move right by one step
(1). The second thing tells it how much to move vertically: negative numbers move us up,
and position numbers move us down, so for 'W' we want to move up (-1) and for 'S' we
want o move down (1).
Great! now we have a movable character! Let's play with it!
Wait... why does it just shoot off the screen??
Well, remember when we said the level has "nothing" around it? That's where our character goes once it moves beyond the screen edges. It's still there, it's just moving around in nothingness. There are a few things we can do to not make this a problem, some of them simple, some of them hard. So let's pick the simple one: let's make sure that the edges of the screen are actually "boundaries", that is to say, lines that characters cannot pass.
In order to make that happen, we'll need to add four boundaries to our level's MyLevelLayer: one for the bottom, one for the left, one for the top, and one for the right:
We've seen all of this already, except for the addBoundary(...) lines. There's
four of them, because there are four edges, and each line adds a particular boundary to the screen.
Remember that the game engine puts everything in the upper left corner when they don't have
specific position, and that is what it considers the point zero: horizontally 0, and vertically 0.
To place the bottom border, we need to draw a line the bottom-left to the bottom-right, so in
game library values: a line with two points, the first point being 0 horizontally, and "height"
vertically, the second point being "width" horizontally and "height" vertically.
We do the same for the other three edges, so that the right edge is from ("width" horizontally, "height" vertically) to ("width" horizontally, 0 vertically), the top edge is from ("width", 0) to (0, 0) and the left is from (0, 0) to (0, height). Now our player can't escape anymore!
But there's one thing left to do - right now if we keep our keys pressed, we'll just keep making our playable character go faster and faster until it hits a wall, and if we let go of the key, it'll keep flying. It would be nice if we could make it slow down to a stop when we let go of our keys. As it turns out, that's really easy: all we have to do is add one instruction to our MyThingy contructor:
That's a complicated function name! O_O
But what it does and how we use it is actually pretty simple. "Impulse" is the scientific name for "the speed of things", and a coefficient is a rather long scientific word for "how much something changes", so an impulse coefficient is just a really fancy name for saying "by how much the speed changes". If we don't change the impulse every time the game library redraws the screen (which it does around 40 times per second!) then our playable character will never slow down unless it hits a wall. So to make it slow down, we tell the game library that we want its speed on the next redraw to be only 3/4th of what it is now. So if we started with a speed of 100, then the next redraw will be 75, and the redraw after that will be 56.25, and the one after that 42.1875, and so forth, until we get to a speed that is so close to zero that the game library just sets it to zero instead of trying to use really, really small numbers.
So, we have a playable character, it can bump into walls so it doesn't escape the screen, there's a nice blue background, and our thingy slows down if we stop pressing keys... what does it look like??
So now we can move around, but there's not really much of a "game" going on, because there's no real reason to do anything. Moving around is pretty cool, but what if we had a reason for moving around? What if... we were being chased by anothing thingy that is intent on catching us?
Alright, now we're talking. Let's make a chasing thingy!
Enemies are very similar to players, except they aren't of the type Player,
but they're of the type Interactor. An "interactor" is something that moves
around and interacts with things in the level, but isn't the player.
Just like players, we need to tell the game library which states the enemy can have,
and just like for our MyThingy, we'll give it one state: idle. However,
we'll give it a different picture, so we can tell where it is:

Nice and red, nice and visible.
So, let's add our enemy to this level! And by level, we of course mean level layer.
So, can you guess what this looks like?
Yup. It's in the level alright, but it's not doing a great deal. That's because we haven't set up any instructions on how the enemy should behave. Normally it's a lot of work to set up enemy behaviour, but the game library that we're using has a nifty little helper instruction that lets us quickly set up an enemy.
We want our enemy to catch us (or, no wait, we don't! but we want it to try so we can avoid it =) and the game library calls this "tracking" behaviour, in the same way that a hunter will track its prey. So let's make our enemy a hunter:
There's some new things here, so first let's look at that implements Tracker
bit at the top. Rememeber when we talked about what extends means? This is similar.
We talked about "mammal" being a super class of "cat", implying that everything that applies
to mammal applies to cats too. If a mammal has fur, then so does a cat, and if a mammal
has babies, then so do cats. This is what we call "property inheritance". The "Cat" class
inherits all the properties of the "Mammal" class. However, this game library also lets
you talk about what some things should be able to do, without saying what they are.That sounds weird, so let's look at an example. Humans and car engines are definitely
not related, they're not super or sub classes of each other! But, they can both run. Now,
I hear you say "but they're not the same for humans and engines" and you'd be right!
A running human is, well, running, whereas a running engine is simply turned on. But
we call both things "running", so it would be handy if we could tell our game library
"I am giving you this thing. It could be a human, or a car engine, or even something
else, but you shouldn't have to worry about that. The thing I'm giving you can run. Just
take my word for it. I'll make sure it can do that".
Well, as a programming instruction we can do exactly that, and we do so by using
the implements ... instruction. In this case, our enemy implements something
called Tracker. In programming terms, "Tracker" is an interface (this
means that it only describes the name of functions that we can call without saying
what they should actually do, like "run") and if we look at the programming
instructions for it in the game library, we see this:
So, Trackers can do one thing, track, and the function for it will
not create new objects or calculate numbers etc., and if we want to make use of it
it will need five things. That looks like a lot, but the game library already knows
how to put all the values in there, so we don't need to worry about what they mean.
(Although if you're curious, the first thing is the "thing" that a Tracker should
track, like a player or another enemy, and the next four things are 'viewbox'
values: the x/y position of the upper left corner of the viewbox, typically your
screen, and the width/height size of the viewbox relative to that x/y coordinate).
So now we know that things that can be considered Trackers need to have a
track function, and if you look at the code we're using for MyEnemy,
there it is!
Now, remember I said there was a convenient function in the game library that lets
us do tracking without having to write lots of instructions ourselves? There it is:
GenericTracker.track(this, actor, 0.05). This also uses something new:
in the same way that we've been making MyLevel, MyLevelLayer, MyThingy and MyEnemy,
the game library already knows about some things, and one of these is the GenericTracker
thing. It has a function called track that doesn't need all those coordinate
values, but just requires you to say who the hunter is, who the prey is, and how fast
the hunter should be able to chase the prey. In this case, the hunter is our MyEnemy
thing, and as you may remember from a little bit up, when we talk about "ourselves",
we can use the word this. It should chase our player thingy, so the
prey should be actor
Why? Well, look at the track function in the Tracker
interface. I told you that the actor there was thing that the Tracker
will track. So that's the prey. We simply refer to that same actor
when we tell the GenericTracker what to do, and done!
Finally, we tell it to be a relatively slow hunter. Instead of moving at normal speed, we tell it to move at one twentieth normal speed (1 divided by 20 is 0.05) so that it won't catch us immediately. We want to make it fun, rather than letting the enemy always catch us!
So, with all that explained, let's put all these instructions in place and see what it does:
Alright! NOW we have a game! Although nothing happens when we get hit. Let's quickly fix that:
We've added two things here. First, in the MyEnemey class we added
a function called overlapOccurredWith. This function is automatically
called by the game library when one actor overlaps with another, and it gets two
things passed long: the other actor that we overlap with, and a list
of decimal numbers (or technically, an array of float
numbers, written as float[]) to tell us the x- and y-distances.
Now, when the enemy hits us, it should... well... HIT us. Conveniently the
game library already has a hit() function defined, so we can simply
call that, and then in MyThingy make sure it does something that
gives us a sign that we've been hit.
So, in MyThingy you can see an implementation for the the hit()
function: the first instruction says "set up a red color, slightly transparent" (technically
it says "make a color with red=200 out of 255, green=0 out of 255, blue=0 out of 255, and
solidness=200 out of 255, so it's an almost solid color, but a little bit see-through), and
then the second instruction says "draw a rectangle with this color, starting 10 pixels
from the left, and 10 pixels above our center point, with a width and height of 19 pixels.
Now we can see when we get hit! So what does it look like?
Sweet. Our very own game! I think that'll do for now, don't you? Next time we're going to look at making making things a bit more fun by introducing things like gravity (so we always "stick" to the ground unless we're jumping), platforms to jump on and off of, and even some items that we can pick up for special powers.
It's going to be awesome.